|
If an organization has multiple sites, the IPX systems can help to establish a VPN to connect remote networks together. A PC in the private network at one site can access a server or another PC in the private network at another site.
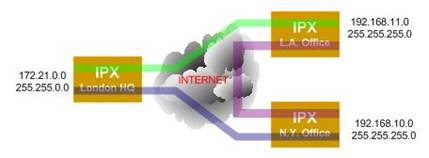
Connect remote networks using secure tunnels
To form a VPN using IPX systems, the IPX should be in the public Internet or at least configured in DMZ at the each site. The IPX can be reached each other with their respective domain names.
By default, the LAN IP address of IPX is 192.168.6.x. This needs to be changed so that each site has different IP subnet as in the diagram. You can give each subnet a name in configuration "Security > Policy Element > Address Book". For example, New_York_Office: 192.168.10.0/255.255.255.0; LA_Office:192.168.11.0/255.255.255.0; London_HQ: 172.21.0.0/255.255.0.0.
IPX VPN is based on secured tunnels that form the peer to peer relationship between sites. The tunnels use shared symmetric security key, which is 8 HEX numbers.
Following the steps in "Security > VPN > IP Tunnel" to add/edit tunnel, you can created one tunnel for each remote IPX. On each remote IPX, you need to do the same thing.
Limitation of IPX Based VPN
The IPX system only supports simple VPN concept. It does not support well the generic IP routing capability over the IP tunnels. For example, if there is another router in the IPX LAN, the PC behind that router might not be able to communicate with remote sites. The IPX does not know how to route IP traffic between the local networks different from the defined IPX LANs.
Additional Notes
From MS Windows explorer, you can input address \\192.168.11.5 to view all sharable objects on that remote PC. You can mount a remote directory to a local PC; you can define hosts file to map a PC host name to its IP address.
Back
|
|
|